BMW E90 E92 3-Series Radio LCD Pixel Repair
Burnt out pixels are a very common issue on BMW E90 3-series. My car is a 2007 328xi with a BMW Professional sounds system. Instead of purchasing a used radio that will probably have the same issue I decided to replace the LCD display. We do sell replacement LCD displays, you can purchase it by clicking here. The procedure is not really difficult but you have to know how to solder and be very careful not to scratch any circuit boards when you are taking things apart. The tools you'll need are pretty basic. You'll need something flat and sharp to remove the climate control panel, a Philips screwdriver to remove and disassemble the radio and a soldering iron.
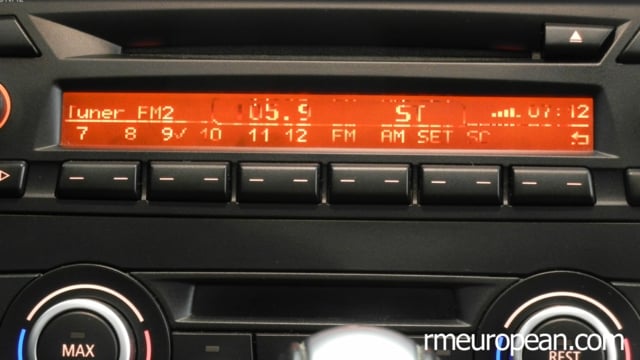
Here is what my LCD display looked like before the repair:
1. Start out by removing the climate control panel. Climate control panel just snaps in place. You will need something sharp and flat to pry it out of the dash.
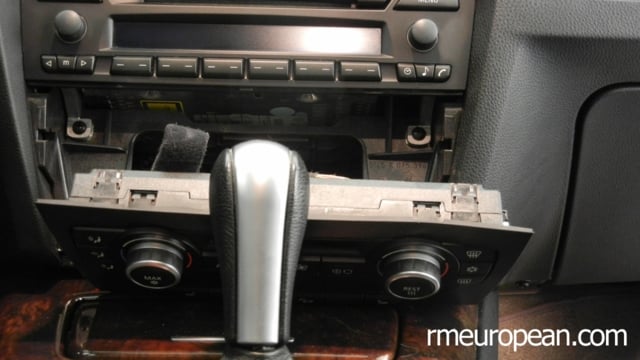
2. Unclip the two wiring connectors for the climate control unit and put the climate control unit aside.

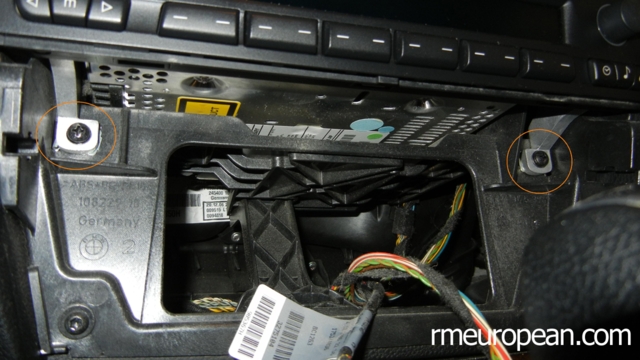
3. Unscrew the two screws that hold the radio in place, pull out the radio and unplug the two connectors in the back. The large connector is unplugged by prying the locking tap up and sliding it towards the back.
4. Now that the radio is out of the car remove the two circled screws for the top cover.

5. Remove the 5 screws for the heat sink and two screws for the mounting bracket.

6. Remove the top cover and unscrew the 3 circled screws for the faceplate.

7. Remove the heat sink and the mounting bracket.

8. Remove the circled screw for the faceplate on the heat sink side.

9. Remove the circled screw for the faceplate on the opposite side.

10. You now can detach the faceplate. Be careful not to damaged the ribbon cable that attaches faceplate to the radio. You can unclip it but I chose to leave it alone. Unscrew the two circled screws for the faceplate circuit board.

11. Pull of the knobs.

12. You now can remove the plastic part of the faceplate with all of the buttons. Here is what the LCD display looks like in its metal housing.

13. You now will need to remove the metal housing. The housing is soldered to the circuit board in two places. Be careful not to burn anything with a soldering iron. You want to use a high power soldering iron so you can melt the solder fast without heating up the board too much.

14. Remove the solder with a desoldering braid or disoldering bulb.

15. You now shold be able to remove the metal LCD housing. Remember how everything is put together so you can reassemble in the same order. There is an orange piece of plastic (I assume it is to make the LCD light up orange), one side of it is orange and the other is white. The orange side goes towards the LCD glass.

16. Remove the old LCD display. The LCD ribbon cables need to be unclipped from their connectors, to do so slide the bottom black portion for the connectors forward towards the ribbon cable.

17. Assemble the new LCD display into the housing. Be careful not to damage anything.

18. That is it. You are pretty much done. Reinstall the new LCD assembly to the circuit board. Slide the ribbon cables into the connectors and lock them. Solder the housing back to the board and reassemble the radio in the same sequence you you disassembled it. The whole project took me about an hour. If i did it the second time it would probably talk half as long. Here is what the new LCD looks like:

Please keep in mind, this article is for information purposes only. I am not an electronics repair technician so whatever advice is given in this article is not professional, use at your own risk. RM European Auto Parts LLC will in no way be liable for any damages that may arise directly or indirectly from the use of this article.